Baking

Zucchini Bread

The first time I made zucchini bread was in grad school. Zucchini must have been on sale because it’s not something I would have bought otherwise on a $1000/month stipend plus a couple of odd part time jobs while paying rent. I was learning how to cook at that time, mostly to because I could no longer afford to eat out with a living budget of about $100/week, if I was lucky. One of the purchases I had made was the New York Times Cookbook, a brick of an anthology that promised to teach me everything I needed to know about cooking. Unfortunately, most of the ingredients listed were unaffordable and the number of steps involved was ridiculously long and complicated for a novice cook. One exception was the zucchini bread recipe.

I made a loaf and brought it to work, the research center that my PhD mentor ran. It was a big hit! Even while complaining about how the zucchini bread was going to affect her waistline and cholesterol level, she always took a couple of huge slices–some for now, some for later. For Christmas every year until I graduated, I made sure she got a loaf. One time, while taking a break from work at the center, she looked at me and said, “You know, Sonya, you probably missed your calling as a baker.”

On one hand, this is not the kind of observation you want to receive from your mentor a couple of years into a PhD program. On the other hand, she had always valued my intellect and work ethic and instrumental in leading me to an academic path. She had hired me as a TA when I was still a master’s student, entrusted me with teaching her course while she was on sabbatical, and made sure I was always financially afloat so that I could complete the work I had started. I chose to take the statement as a compliment.

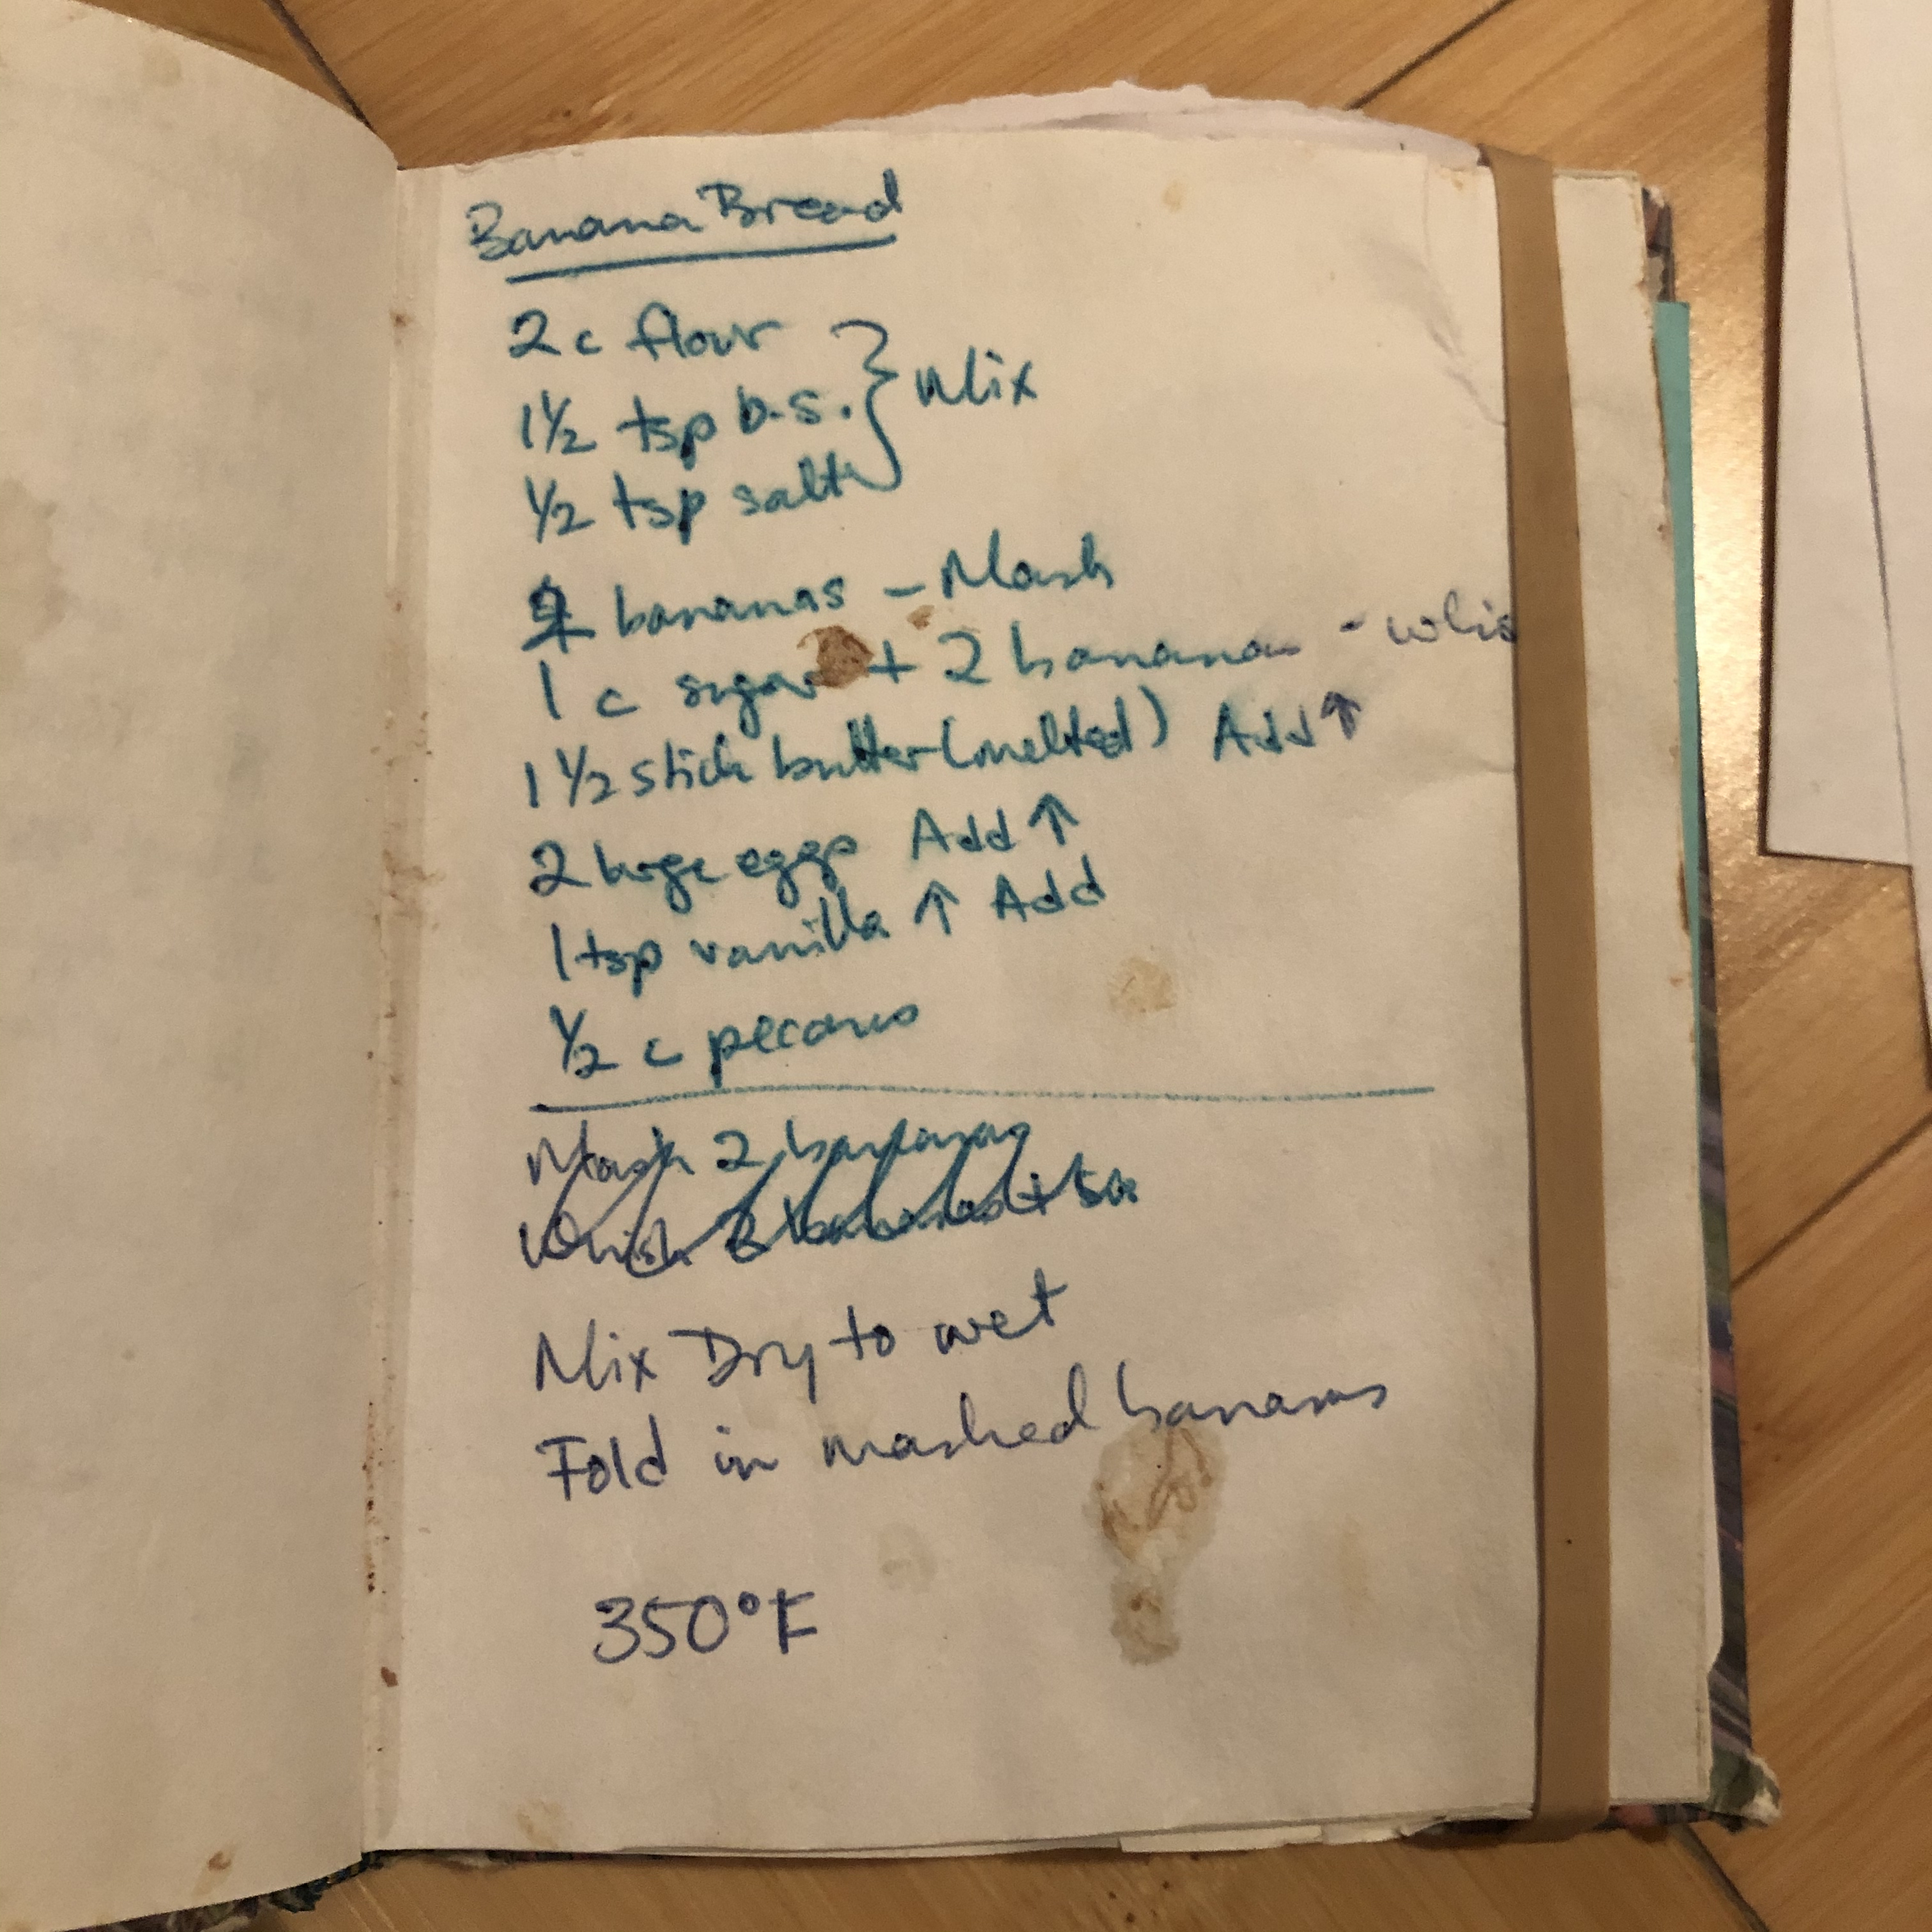
I have since given away the New York Times Cookbook, discovering that it was filled with esoteric dishes that I would not try, even now, as an experienced cook. However, I decided to copy down the zucchini bread recipe for posterities.

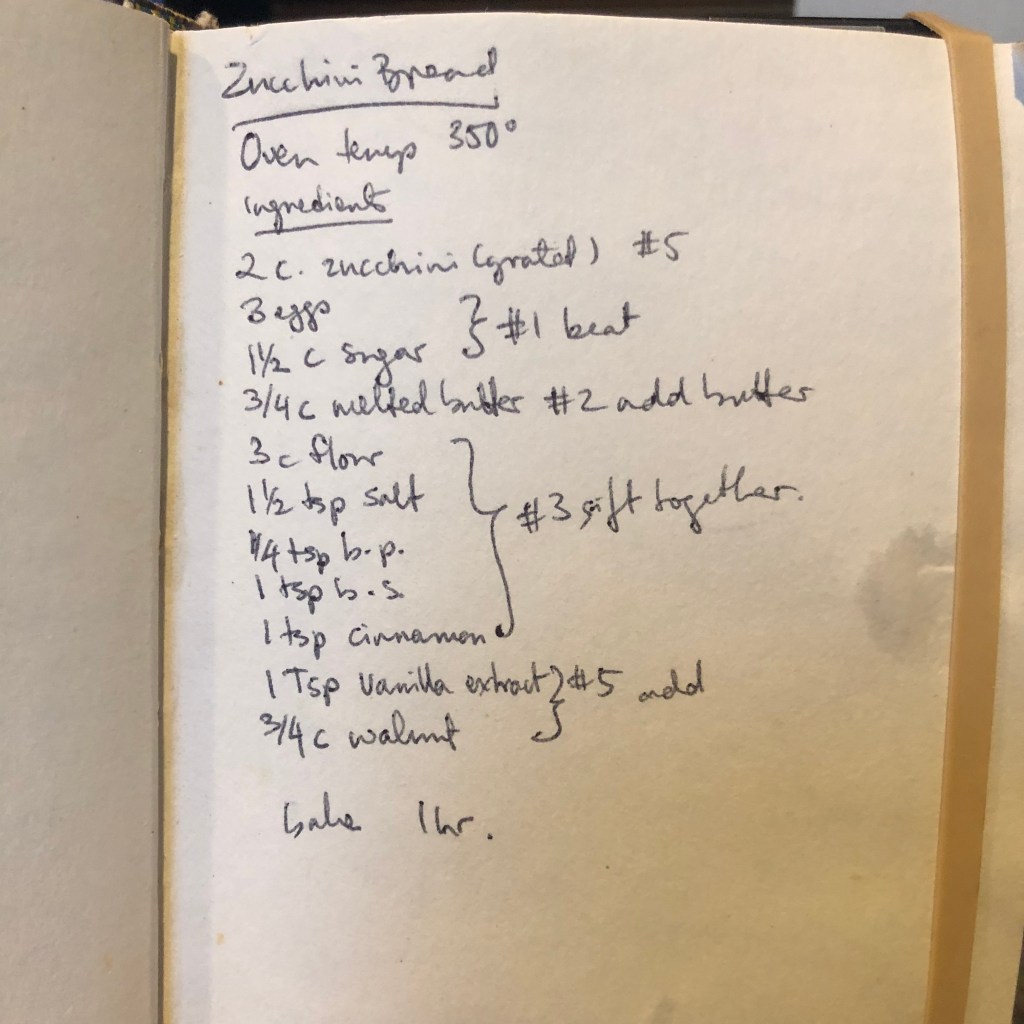
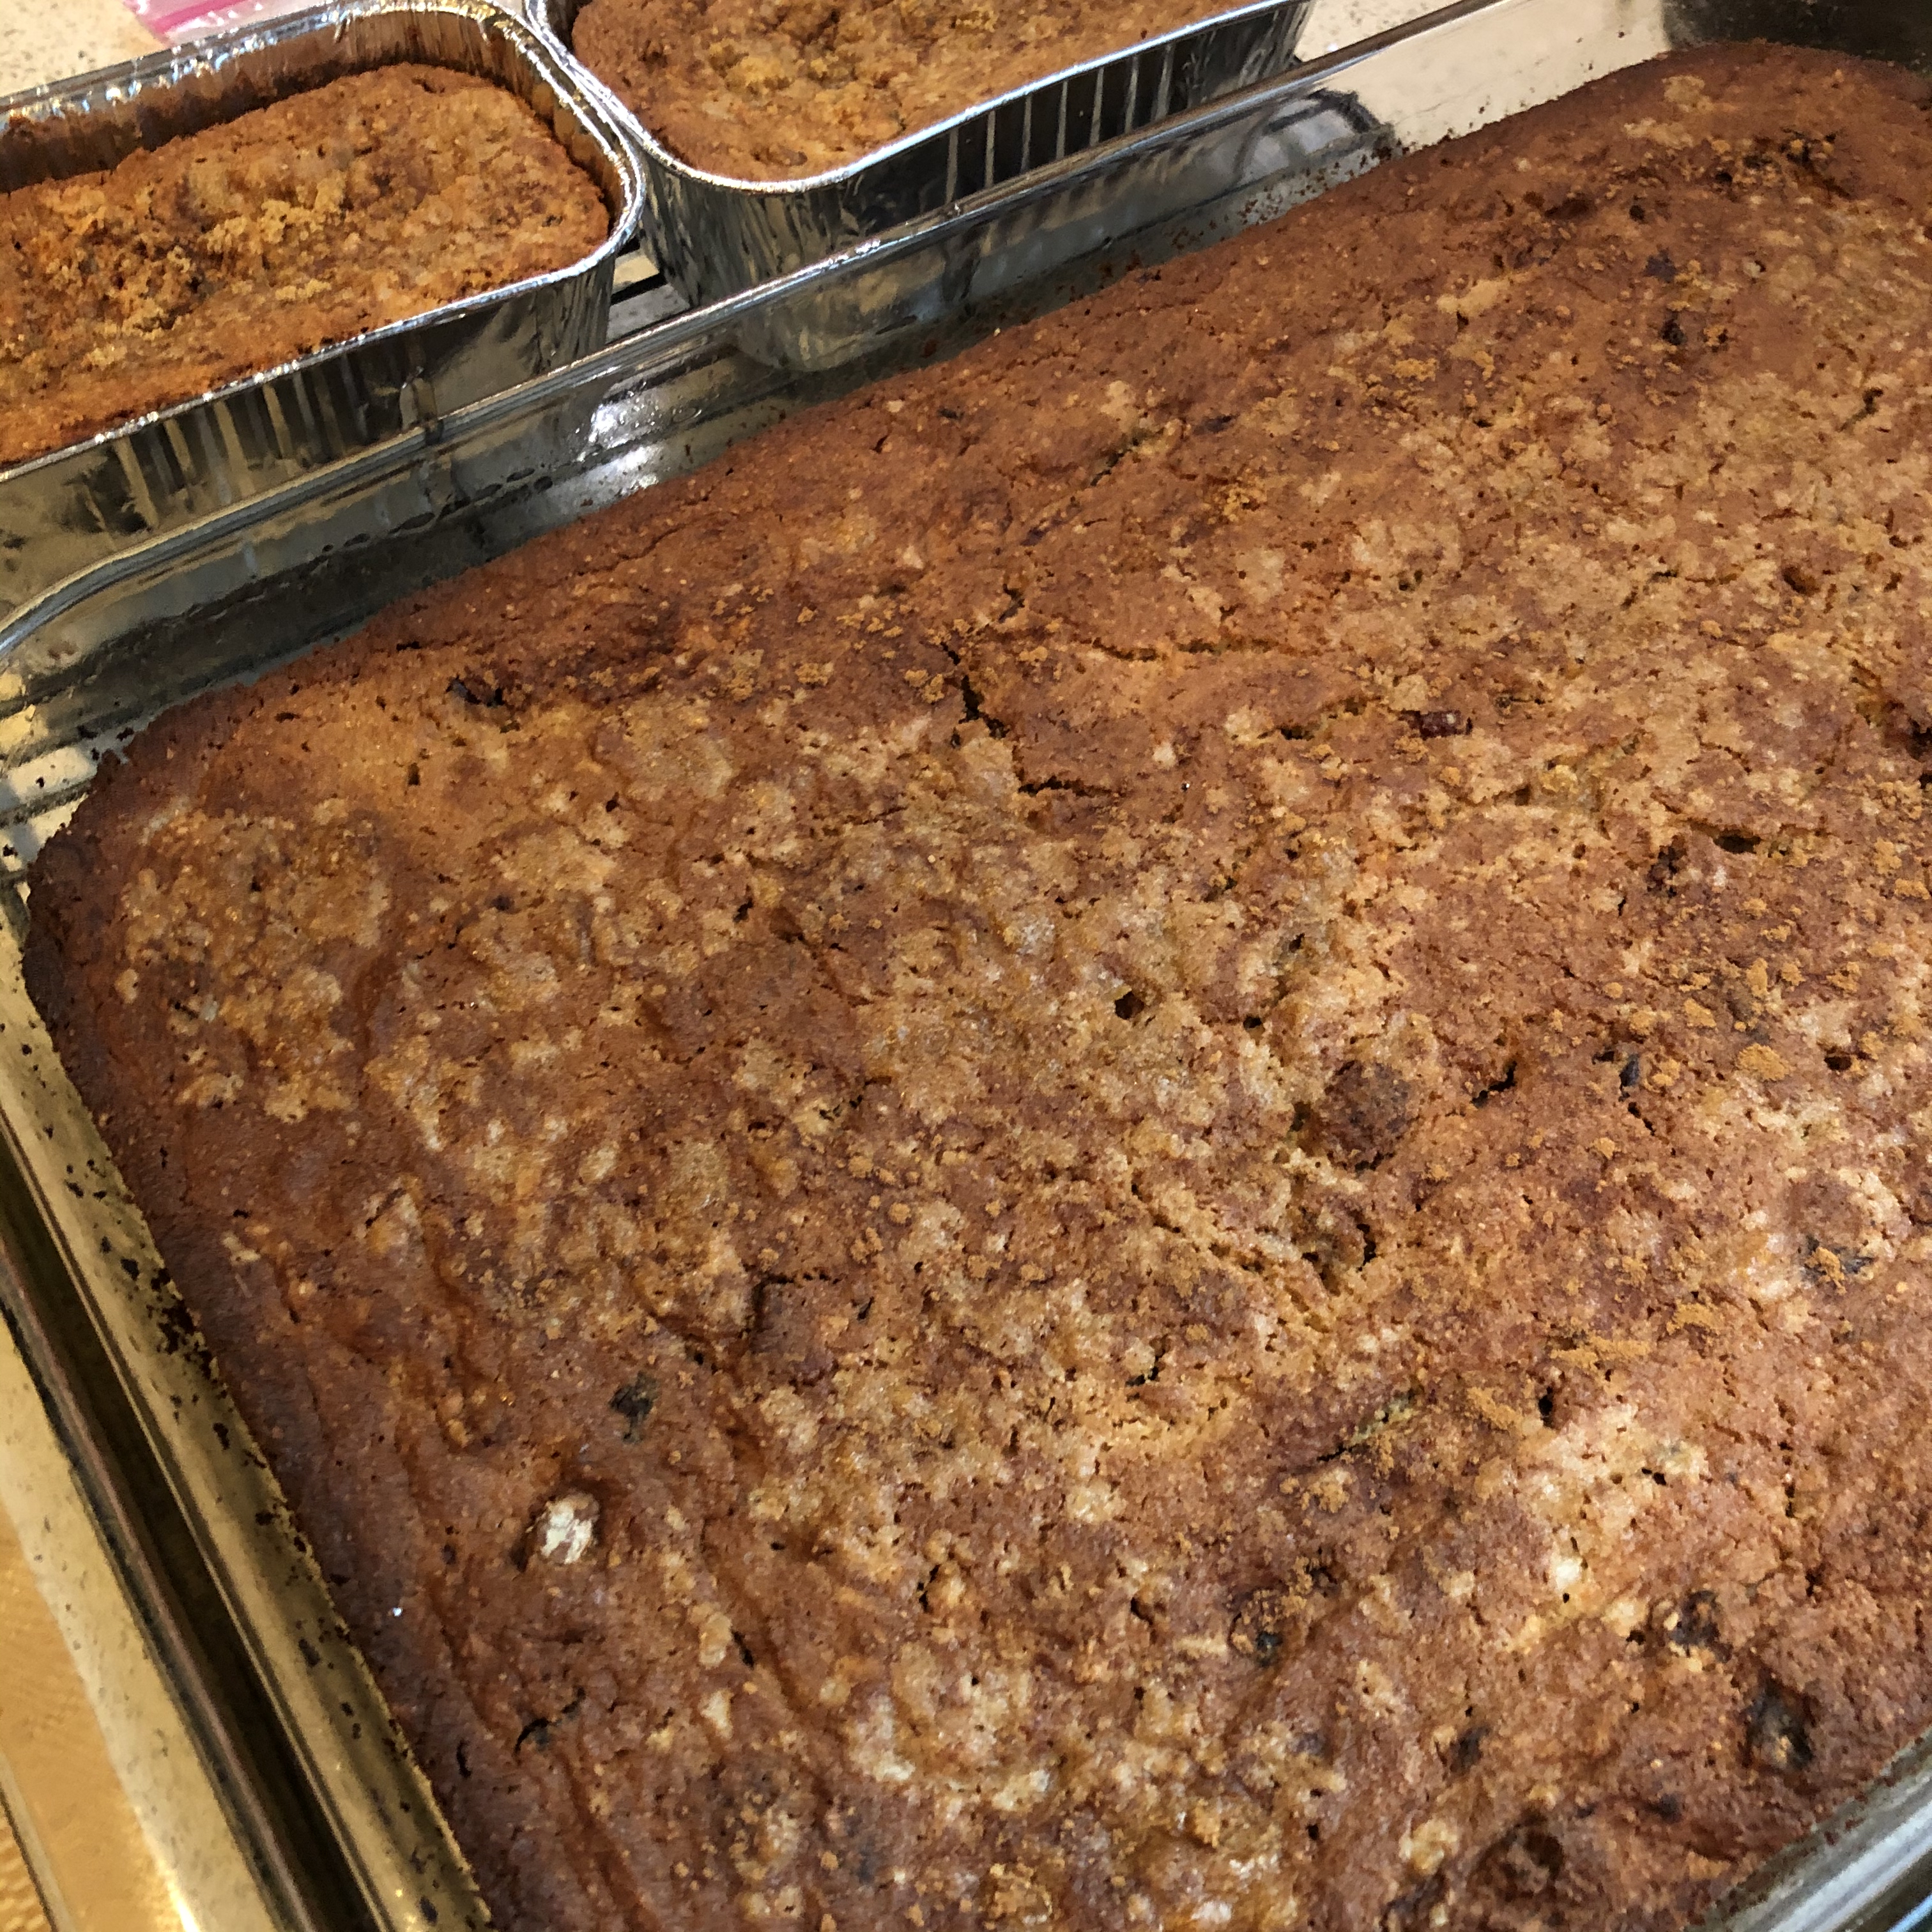
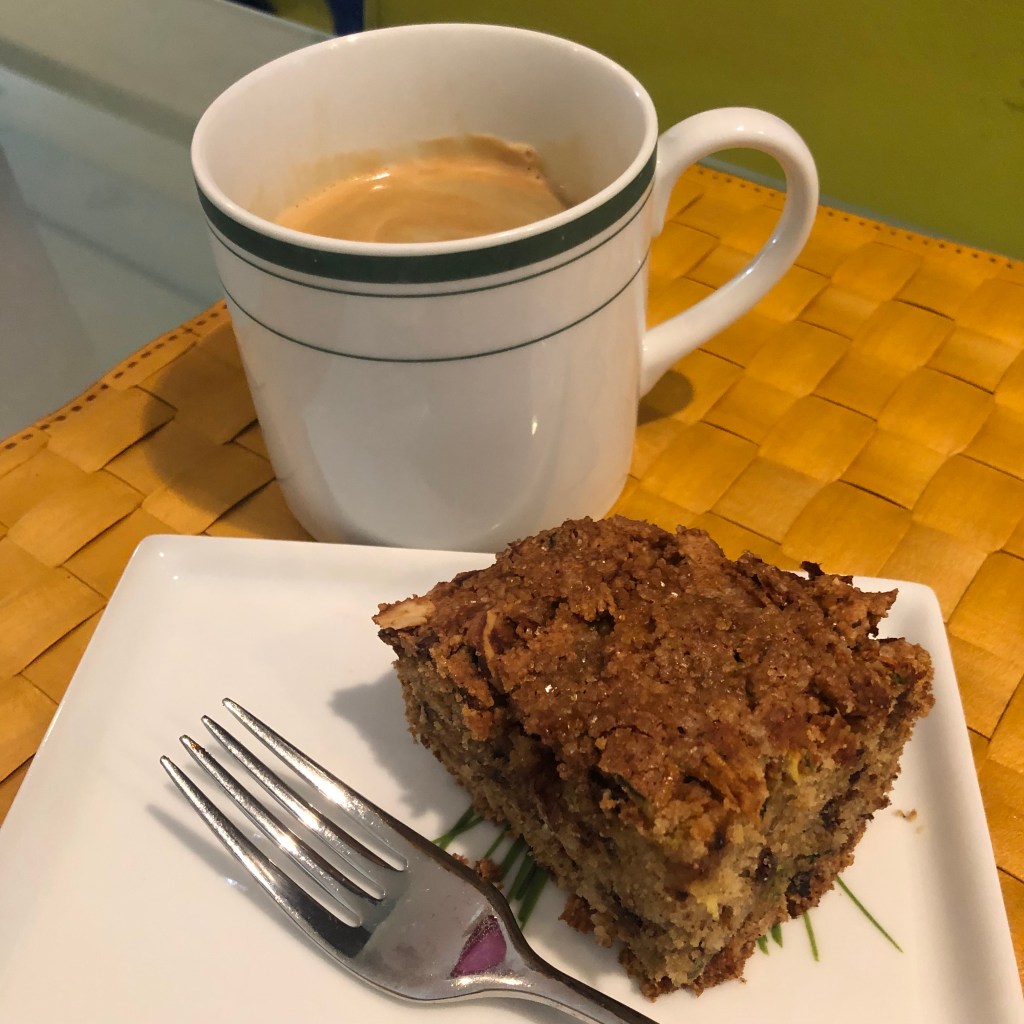
It is a well-loved recipe, dripped on and smudged with bits of ingredients over almost twenty years. It is supposed to be baked in a loaf pan but I actually prefer to use a bundt pan. I often double the recipe and bake it in a 9×13 casserole pan. I have even tripled the recipe before and baked it in a chafing pan. There are other flourishes, such as using pecans or slivered almonds instead of walnuts, adding chocolate chips (a pro tip I got from a friend who asked for chocolate chip zucchini bread as a wedding present), streusel topping, different spice combinations, using other summer squashes in addition to or instead of the standard green one, etc. The plain, original version is the most versatile, especially if it’s made with less sugar, which I do for most baking recipes. Apparently, it’s delicious, sliced thin and toasted with a schmear of cream cheese.

Many years later, on a random street corner, I ran into my mentor and her husband. His face lit up when we were introduced and exclaimed, “You are the zucchini bread baker!” I had always thought that if I had to ever go into witness protection, change my identity, and make a living doing something completely different from my current career, I would open a coffee shop and make my own pastries and quick breads since I had the calling.

Maybe not…

Baking

Pão de queijo

Several years ago, I traveled to São Paulo, Brazil for work. It was a very quick trip with a colleague who had grown up in Brazil and it was literally four days of back to back meetings. I didn’t see much of the city the two times I was in São Paulo, just a lot of highways and interior of buildings. I remember traffic being so bad that EMTs worked as pairs on a motorcycle so that weave in between the cars to get to medical emergencies. I remember the favelas on the hillside looking down onto one of the most prestigious universities in the country. I remember a vibrant nightlife where bars and restaurants were open late with sidewalks filled with young and old, watching football (soccer in American), laughing, eating, and drinking. I remember walking to the Ai Weiwei exhibit at a nearby museum past luxury car dealerships and posh houses and spraining my ankle on my walk back when I tripped over a flying garbage bag. I remember October being warm and welcoming, just like the people I met during my very brief visits. I remember the look of respect from the bartender when I ordered a cachaça neat instead of the usual caipirinha. I remember the food. Some of the flavors reminded me of the rich stews I grew up eating in Ghana. Some, like farofa, was completely new in taste and texture. And then, there was the ever present pão de queijo.

The breakfast at the hotel and in every coffee service for meetings, there was inevitably a bowl piled high of the golf ball sized bread. On most busy streets, there was a pão de queijo chain shop, much like you would a Dunkin Donuts, and people streamed in and out with a warm bag and a cup of strong Brazilian coffee. Being gluten free, I generally avoid the bread area, especially when traveling for work. There is nothing worse than being on a plane with a stomach ache or having to ask where the bathroom is in a different language. It looked tempting, but I steered clear of it on the first day.

On the second day, I asked my colleague what it was and why it was served all the time. He explained that it was pão de queijo, a traditional Brazilian cheese bread made with manioc flour, an edible root. I had no idea what manioc was but hell, it wasn’t wheat, so from that moment on, I chowed down on as many pão de queijo as I could get my hands on (with a lot of Lactaid pills, I might add). My hosts looked at me wth curious amusement at my enthusiasm for the bread.

The second time I was in São Paulo, I made sure to visit the grocery store to get a few bags of the pão de queijo mix. One of the unexpectedly delightful things about Brazil was that all packaged food items were marked to indicate whether it contained gluten so if I checked for “sin gluten” I was safe. GF package information had yet to be a standard in the United States and since I didn’t understand Portuguese to make out the ingredients, this took the guessing game out of the shopping process.

Once in Philadelphia, I followed the picture directions on the back of the package and was able to make some reasonably good pão de queijo. The problem was I never went back to Brazil and I was out of mixes. I tried out many recipes and finally settled on the recipe on Bon Appétit magazine. Although manioc/cassava/tapioca is used interchangeably, I am fairly certain there are regional differences to the root and consequently the flour that is milled from it. Also, fresh minas cheese is difficult to find in the US so the taste is not exactly as I remembered. Nevertheless, after many years of making it, I think I am finally settled on a pretty good approximation.

The awesome thing about pão de queijo is that it is an all-occasion bread that goes with everything. I have eaten it plain, smeared with jam, as an accompaniment for soup, in place of crackers for a meats and cheese platter, with chili. Explains why a batch doesn’t last more than three days on the counter. It’s best fresh out of the oven but if it’s cold, I prefer to zap it in the microwave for about 12 seconds to get back the chewy texture.

My tips:

  • Until recently, I could only find tapioca flour/starch in Asian grocery stores. Nowadays, it is pretty easy to find now in most grocery stores so I stopped looking for manioc flour. Tapioca flour/starch is very fine so careful when dumping the flour and mixing vigorously–you, and your kitchen, will be covered in white powder. I have to constantly remind myself to pour all the flour gently into the pot all at once then mix quickly but slowly at first until the flour is about half incorporated.
  • We don’t drink a lot of milk at home and whenever I buy a carton, I end up throwing out half of it. Also, during COVID, I shopped much more infrequently so the chances of having milk, especially whole milk, lying around was pretty much zero. Most plant based milk doesn’t have the fat content necessary to bring out the richness of the bread. In a pinch, I tried coconut milk and it worked! I usually have a few single use cartons of shelf stable coconut milk at home for soups and curry. Most recently, I bought coconut milk powder that can be reconstituted with water because I am suspicious of stabilizers on shelf stable items. Works just as well.
  • Minas cheese is fresh cheese so difficult to find, even in specialty cheese stores. I tried many cheese combos suggested by recipes and realized that there was not much variation in texture although there was variation in taste. Over time, I inevitably find bit of different kinds of cheese in small baggies. I started collecting them and when it looks like I can grate about 2 cups, I make pão de queijo. I have even used Bulgarian feta before. The trick is to make sure to have few chunky bits of cheese as possibly for even distribution and rise. The darker bits in the photo below are the cheese chunks.
Pão de queijo made with bits and pieces of leftover cheese, including Cacioricotta del Cilento, Manchego, Cacio di Bosco Tartufo, and 30 year old parmigiano reggiano.

A friend and I tossed around the idea of starting a pão de queijo shop called “Girls with Balls” one day. Who knows? Could still happen.

Baking

Mini’eesh

The first bread that I learned how to make with fairly reliable consistency is mana’eesh. Mana’eesh is a Lebanese flatbread with za’atar. Mana’eesh (or sometimes manakish) is the plural term. Mana’oushe is the singular term.

Each time the dude’s parents visit the United States, they bring a kilo or two of freshly made za’atar from the best vendor in Beirut. She would make sure that the za’atar is fresh, as in it was made within the week or their travel date. Once in the US, she would bake mana’eesh and wrap them individually in foil so that it could be frozen then thawed/rebaked in the oven. The entire house will be filled with the aroma of warm bread and herby goodness and linger afterward for several hours. It is the smell of warmth.

The dude doesn’t speak much about his early childhood in Lebanon. Like so many families, they left suddenly during the war in the 1970s. From what I remember about my Lebanese friends in Ghana whose family escaped their homeland (if not at the time, in the proceeding few years), while they themselves remembered little and some were born in Ghana and held Ghanaian citizenship, the feeling of displacement was indelibly linked with their identities. When the war was over, they went to visit family each summer and speak hopefully about the time they would go home. Some did; many did not. The dude never returned.

For that reason, I was surprised that he voluntarily mentioned the happiness of smelling fresh mana’eesh in a nearby bakery, one of the few memories he had of his childhood in Beirut. It explained his excitement every time his mom made it for him and it made me sad that the leftover za’atar sat in the pantry, unused for months. Also, since his mom always made mana’eesh in their apartment and never on site, I had no idea what that smell was, whether it was same or different from the reheated version.

So, I decided to give it a go at making mana’eesh myself.

Mind you, at the time, I had just gotten over my fear of baking with yeast (focaccia turning into a frisbee will get you off breadmaking for a while), and the only other dough I had made successfully was pizza. Since I am gluten free, I had no idea of gauging success by eating and tasting. With pizza, at least I know what it’s supposed to look, smell, and taste like and I remember the mouthfeel of the dough. Luckily, the dude enthusiastically agreed to eat through all the experiments.

First stop in learning how to make something was his mom. But like most moms who have been making something for a long time, it was difficult for her to actually explain what to do and nothing came with measurements. And, like me, she doesn’t like company in the kitchen so I didn’t press the issue. I tried several recipes with varying success. Finally, I found the one that I use consistently, which is Yotam Ottolenghi’s recipe I stumbled upon. This is one that I also received a thumbs up from his dad.

There are a few notes to this recipe, based on my experience:

  • No yogurt. It’s not how the dude remembers and it’s not how his mom makes it. Just the za’atar/olive oil paste.
  • Instead of caster sugar, I used 1 Tbsp of honey. So the yeast mixture is 300ml filtered water, 1 Tbsp honey, 2 tsp dry yeast.
  • The olive oil in the recipe is not divided up (pet peeve in recipes). Most of the oil in the recipe is for the za’atar paste save for 2 Tbsp. The dough is as follows: 4 cups bread flour, 2 tsp sea salt, 2 Tbsp olive oil, and yeast water mixture. I measure everything by volume and not weight. The breadmaking purists would say that volume is too much of an approximation; I am just too lazy to bring out the kitchen scale.
  • I often replace up to half the bread flour with whole wheat flour. The dough will not be not as stretchy and chewy and bubbly but it does have more nutrients.
  • The promised land for the right dough is when it bubbles up with air pockets, sometimes as big as a ping pong ball. To get this consistency, I found that there are 3 things that should be done: 1. Knead it for 10-15 minutes until smooth; 2. The dough should feel slightly moist and sticky on the hands without actually sticking; and 3. After the initial rise and after dividing the dough, let it sit for a bit for until it’s pliable before rolling it out. I don’t have a commercial oven and baking pans large enough to bake all 12 breads at once. Also, I don’t like to bake more than one pan at a time. What ends up happening is that the there will be some inconsistencies in the final result based on how long the dough has rested after the initial rise and the middle half will be more bubby than the first and last pans.
  • Roll out the dough pretty thin, more than 1/8 but thinner than 1/4 inch. I found that stretching the dough first and rolling out the dough quickly helps with the bubble formation.
  • Most recipes have a shmear of the za’atar/olive oil paste. I often use close to half a pound with each batch. This is an individual preference because the za’atar has a very strong smell and taste. The dude is of the opinion that za’atar on dog turd would taste good so I coat the dough with the mixture like I would coat pizza dough with tomato sauce.
  • I have the oven temperature to 400F from beginning to end. Because I bake two at a time, I can’t really heat up the pan each time and reduce the temperature. It works just fine.

Even now, some days produce better bread than other days. I make it roughly once every 7-10 days because this is the dude’s favorite bread so I get a lot of practice. The process, from beginning to end, takes about 3 hours.

Finally, just in case you are wandering, “Mini’eesh” is not a typo. This recipe is supposed to make mana’eesh that are about 7-8 inches and some bakeries have them as big as 12 inches wide. I have yet to learn how to cut the dough properly so that they are roughly the same size. One time, about half of them came out to be less than 5 inches in diameter so I labeled them “Mini’eesh” in the freezer bag. We all had a good laugh and the name stuck.

Baking

Banana Bread

The first thing I ever tried to bake was banana bread. I must have been in my early teens, still living in Accra in the Airport Road house. The details of the recipe and what I did is not clear. What I do remember was that whatever came out of that oven was so awful that even the dog wouldn’t eat it.

Since then, I have experimented with a lot of different kinds of banana bread recipes with many variations and this is the one I settled on. It’s my short hand scribbled note of Tyler Florence’s Banana Bread with Pecans and it is the base of all my banana breads. The key here is the 2 bananas mashed to create the cream base for the batter.

Over the years, I have made numerous substitutions and enhancements to this recipe. Here are some common ones:

  • 1/2 cup olive oil for 3/4 c melted butter or 1/2 cup melted butter + 1/4 cup olive oil
  • Walnuts or almonds for pecans (because I don’t usually have pecans on hand) but any nut would probably work
  • 1/2 cup chocolate chips in addition to the nuts, 1 cup if it’s mini chocolate chips
  • Streusel topping
  • 50/50 brown sugar/granulated sugar
  • 50/50 erythritol/granulated sugar, when I was experimenting with low sugar baking
  • Dried cranberries and slivered almonds
  • Chopped dates or figs
  • 1/4 cup rum or bourbon instead of vanilla
  • For GF flour substitution, I use 1.5 cup oat flour + 1/2 cup almond meal + 1/2 cup tapioca flour or 1.5 cup oat flour + 1/2 cup coconut flour + 1/2 cup tapioca flour

This recipe can be made in a bundt pan or doubled for a 9×13 pan or tripled for a chafing pan.

If there is a pro tip for this recipe, it would be a state of the bananas when they are used. Several years ago, I had to order breakfast for about 400 people and decided to order a few cases of bananas. Of course, I had no idea what a case of bananas looked like or how many bananas were in each case. Let’s just say that not enough people ate the bananas and I couldn’t give them away fast enough so I came into possession of a boatload of bananas. I like to eat my bananas just as they develop spots. The dude, on the other hand, likes it slightly green around the tips and stem (YUCK!) so we could not eat them before they started to wither.

Being raised by a dad who had memories of going hungry as a child and a mom whose family owned a farm meant that wasting food was a big no no in our house. When I received my first lecture about leaving food on the plate, it was the entire process of rice farming and how painstaking it was to get one grain of rice on the table. I was about five at the time and it left an impression. So that meant I was compelled to freeze about 7 or 8 gallon freezer bags of peeled bananas.

Frozen, it doesn’t look so bad. But you have to thaw out the bananas before using and that is always a horror show. Black goopy mess in slippery banana liquid with an unctuous, slightly fermented smell that had hints of wanting to be rum… It’s pretty gross. However, it does make the best banana bread batter. I just puree it with an immersion blender for the batter and then the liquid actually gives the finished bread a complex flavor. If you like chunks of bananas in your banana bread, I suggest using ones that are just getting brown on the counter. The other option is to cut the frozen ones into chunks and setting them aside but most of the time, I forget to do this and let’s just say that trying to mash thawed banana is not very pleasant.

These freeze really well, but remember to cut them into single portions first.